Android Activity启动流程

Android Activity启动流程

Activity是四大组件之一,其启动流程分为两种:

  • 显式启动 :必须实现知道类名
  • 隐式启动 :只需要知道组件名称即可

Android的任务栈

了解任务和返回堆栈 | Android 开发者 | Android Developers

用户一系列操作的Activity是按打开顺序排列在一个返回堆栈里的,返回时就会按堆栈的排列返回

image-20221008204322022

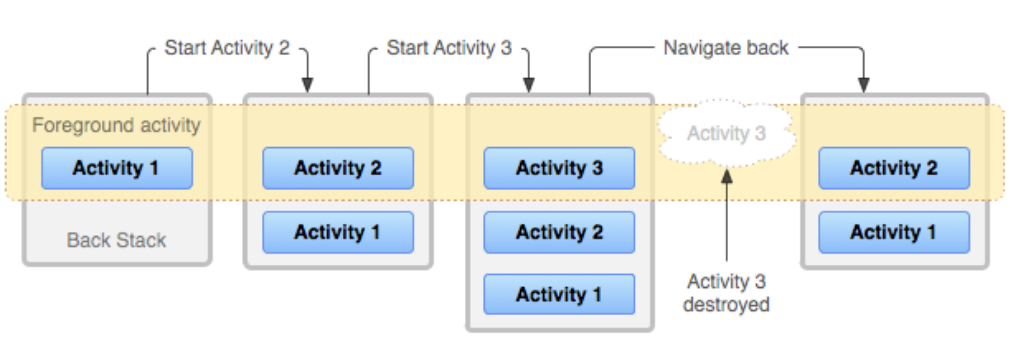
在当前 Activity 启动另一个 Activity 时,新的 Activity 将被推送到堆栈顶部并获得焦点

Android上是允许多任务的,一个任务就是一个任务堆栈Task,决定新的Activity是不是开启一个新的Task是由intent参数决定的,而一般从主屏幕启动一个新的活动,都是开启一个新的Task

image-20221008204404192

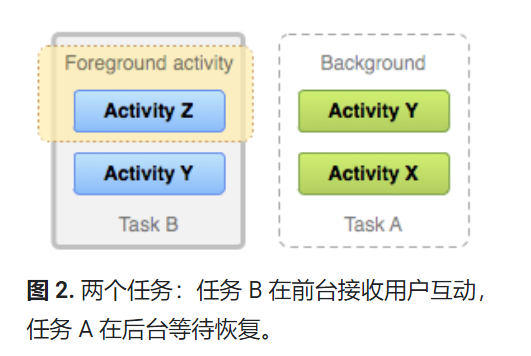
当新应用启动时,系统会启动该应用的任务(任务 B),该任务具有自己的Task堆栈。与该应用互动后,用户再次返回到主屏幕并选择最初启动任务 A 的应用。现在,任务 A 进入前台,其堆栈中的所有三个 Activity 都完好如初,堆栈顶部的 Activity 恢复运行。

image-20221008204435758

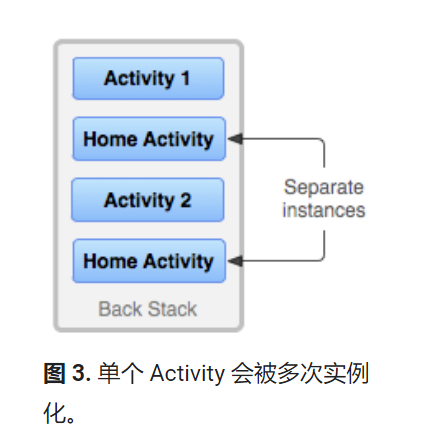
Android也支持在一个TaskStack里面,一个Activity被多此实例化

Intent里面有一个启动flag是FLAG_ACTIVITY_NEW_TASK

image-20221008204532062

如果当前启动的Activity没有Task就会启动一个新的Task,否则就把其所在的task移动到前台,然后要启动的Acitivty的onNewIntent会被调用一下

根Activity的启动流程

Launcher端startActivity

根Activity一般是在Launcher中点击APP图标启动起来的,因此我们从Launcher中分析

1
2
3
4
5
6
boolean startActivity(View v, Intent intent, Object tag) {
intent.addFlags(Intent.FLAG_ACTIVITY_NEW_TASK);

} else {
if (user == null || user.equals(android.os.Process.myUserHandle())) {
startActivity(intent);

Launcher启动根Activity就加上了FLAG_ACTIVITY_NEW_TASK的flag

Launcher继承自Activity,这里调用的startActivity(intent)就是Activity里的

1
2
3
4
5
6
7
8
9
10
11
12
13
14
15
16
@Override
public void startActivity(Intent intent) {
this.startActivity(intent, null);
}


@Override
public void startActivity(Intent intent, @Nullable Bundle options) {
if (options != null) {
startActivityForResult(intent, -1, options);
} else {
// Note we want to go through this call for compatibility with
// applications that may have overridden the method.
startActivityForResult(intent, -1);
}
}

这里传的options是null,所以走的是else

1
2
3
4
5
6
7
8
9
10
11
12
13
14
15
16
17
public void startActivityForResult(@RequiresPermission Intent intent, int requestCode) {
startActivityForResult(intent, requestCode, null);
}


public void startActivityForResult(@RequiresPermission Intent intent, int requestCode,
@Nullable Bundle options) {
if (mParent == null) {
options = transferSpringboardActivityOptions(options);
//mInstrument用来监控应用程序和系统之间的交互操作,
//mMainTHread是用来描述一个应用程序进程,起始ActivityThread对象
//getApplicationThread获取内部一个ApplicationThread的Binder本地对象
//mToken是一个Binder代理对象,指向AMS中的ActivityRecord本地对象
Instrumentation.ActivityResult ar =
mInstrumentation.execStartActivity(
this, mMainThread.getApplicationThread(), mToken, this,
intent, requestCode, options);

mParent表示当前acitivty被包含在其他Activity中,一般是Fragment才有这个情况,所以这里mParent为Null

image-20221008210452662

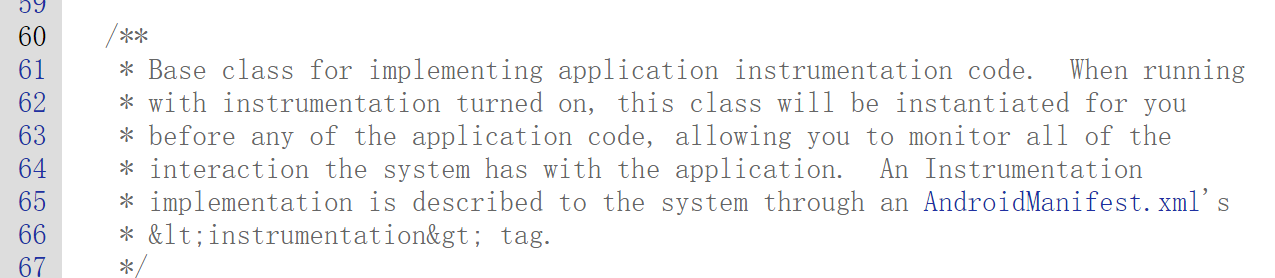
Instrument类的说明,这里就是经由Instrument类,导致我们可以通过Instrument来监控应用程序和系统之间的交互,比如这里告知AMS启动Activity

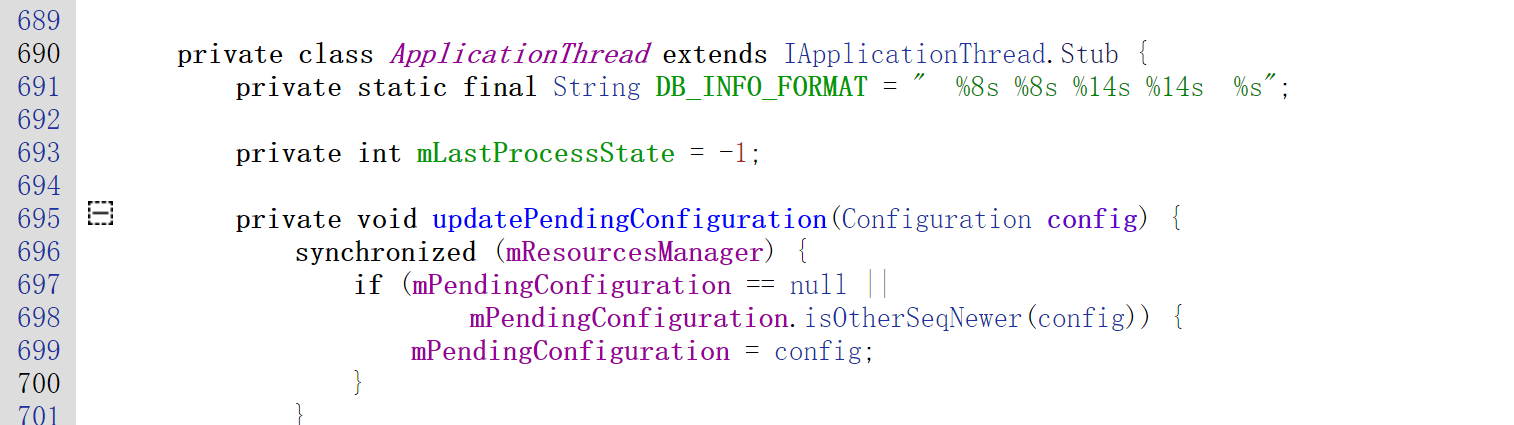
这里传入了几个参数,第一个是源Activity的Context,传的也就是this,第二个参数是一个ApplicationThread,用来描述应用程序进程,每当系统启动一个应用程序进程时,都会在里面加载一个ActivityThread实例,

image-20221008210726321

image-20221008210738219

ActivityThread和ApplicationThread

这里涉及两个类ActivityThread和ApplicationThread

image-20221008210851590

ApplicationThread是个Ibinder对象,

image-20221008210915473

ActivityThread就是一个类,代表一个应用程序进程,而ApplicationThread是作为Binder对象,把其传给AMS,AMS就可以跟应用程序进行通信了。

ActivityThread 是包含ApplicationThread的

第三个参数mToken也是一个IBinder类型的代理对象,其指向AMS里面ActivityRecord的本地对象

ActivityRecord记录已经启动的Activity组件的运行状态,这里其实就指向Launcher的ActivityRecord

(因为AMS作为系统的Activity管理器,肯定得有个类管理Activity的信息)

image-20221008211542364

第四个参数是哪个Activity执行的动作,所以还是传this

第五个参数intent就不用说了

1
2
3
4
5
6
7
8
9
10
11
12
13
14
15
16
17
public ActivityResult execStartActivity(
Context who, IBinder contextThread, IBinder token, Activity target,
Intent intent, int requestCode, Bundle options) {
IApplicationThread whoThread = (IApplicationThread) contextThread;
try {
intent.migrateExtraStreamToClipData();
intent.prepareToLeaveProcess(who);
//获得一个AMS的代理对象
int result = ActivityManager.getService()
.startActivity(whoThread, who.getBasePackageName(), intent,
intent.resolveTypeIfNeeded(who.getContentResolver()),
token, target != null ? target.mEmbeddedID : null,
requestCode, 0, null, options);
checkStartActivityResult(result, intent);
} catch (RemoteException e) {
throw new RuntimeException("Failure from system", e);
}

调用ActivityManager.getService就是获得AMS的代理对象

image-20221008212122385

IActivityManagerSingleton是一个单例对象,get就是调用其new跟的构造函数

image-20221008212146923

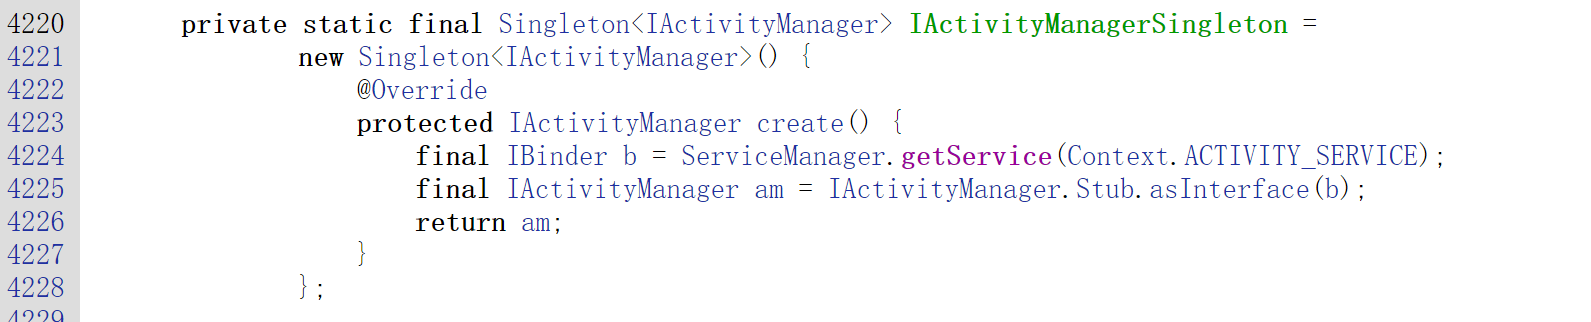
就是从SM那获取ACTIVITY_SERVICE,然后封装成一个继承IActivityManager接口的代理对象,

老版本还在用ActivityManagerProxy这个函数作为代理对象,新版本世界就是直接用的AIDL的Proxy和Stub实现的AMS服务

这样找startActivity就得去IActivityManager.java的Proxy里找,这里就是常规的封装参数,然后调用Transact
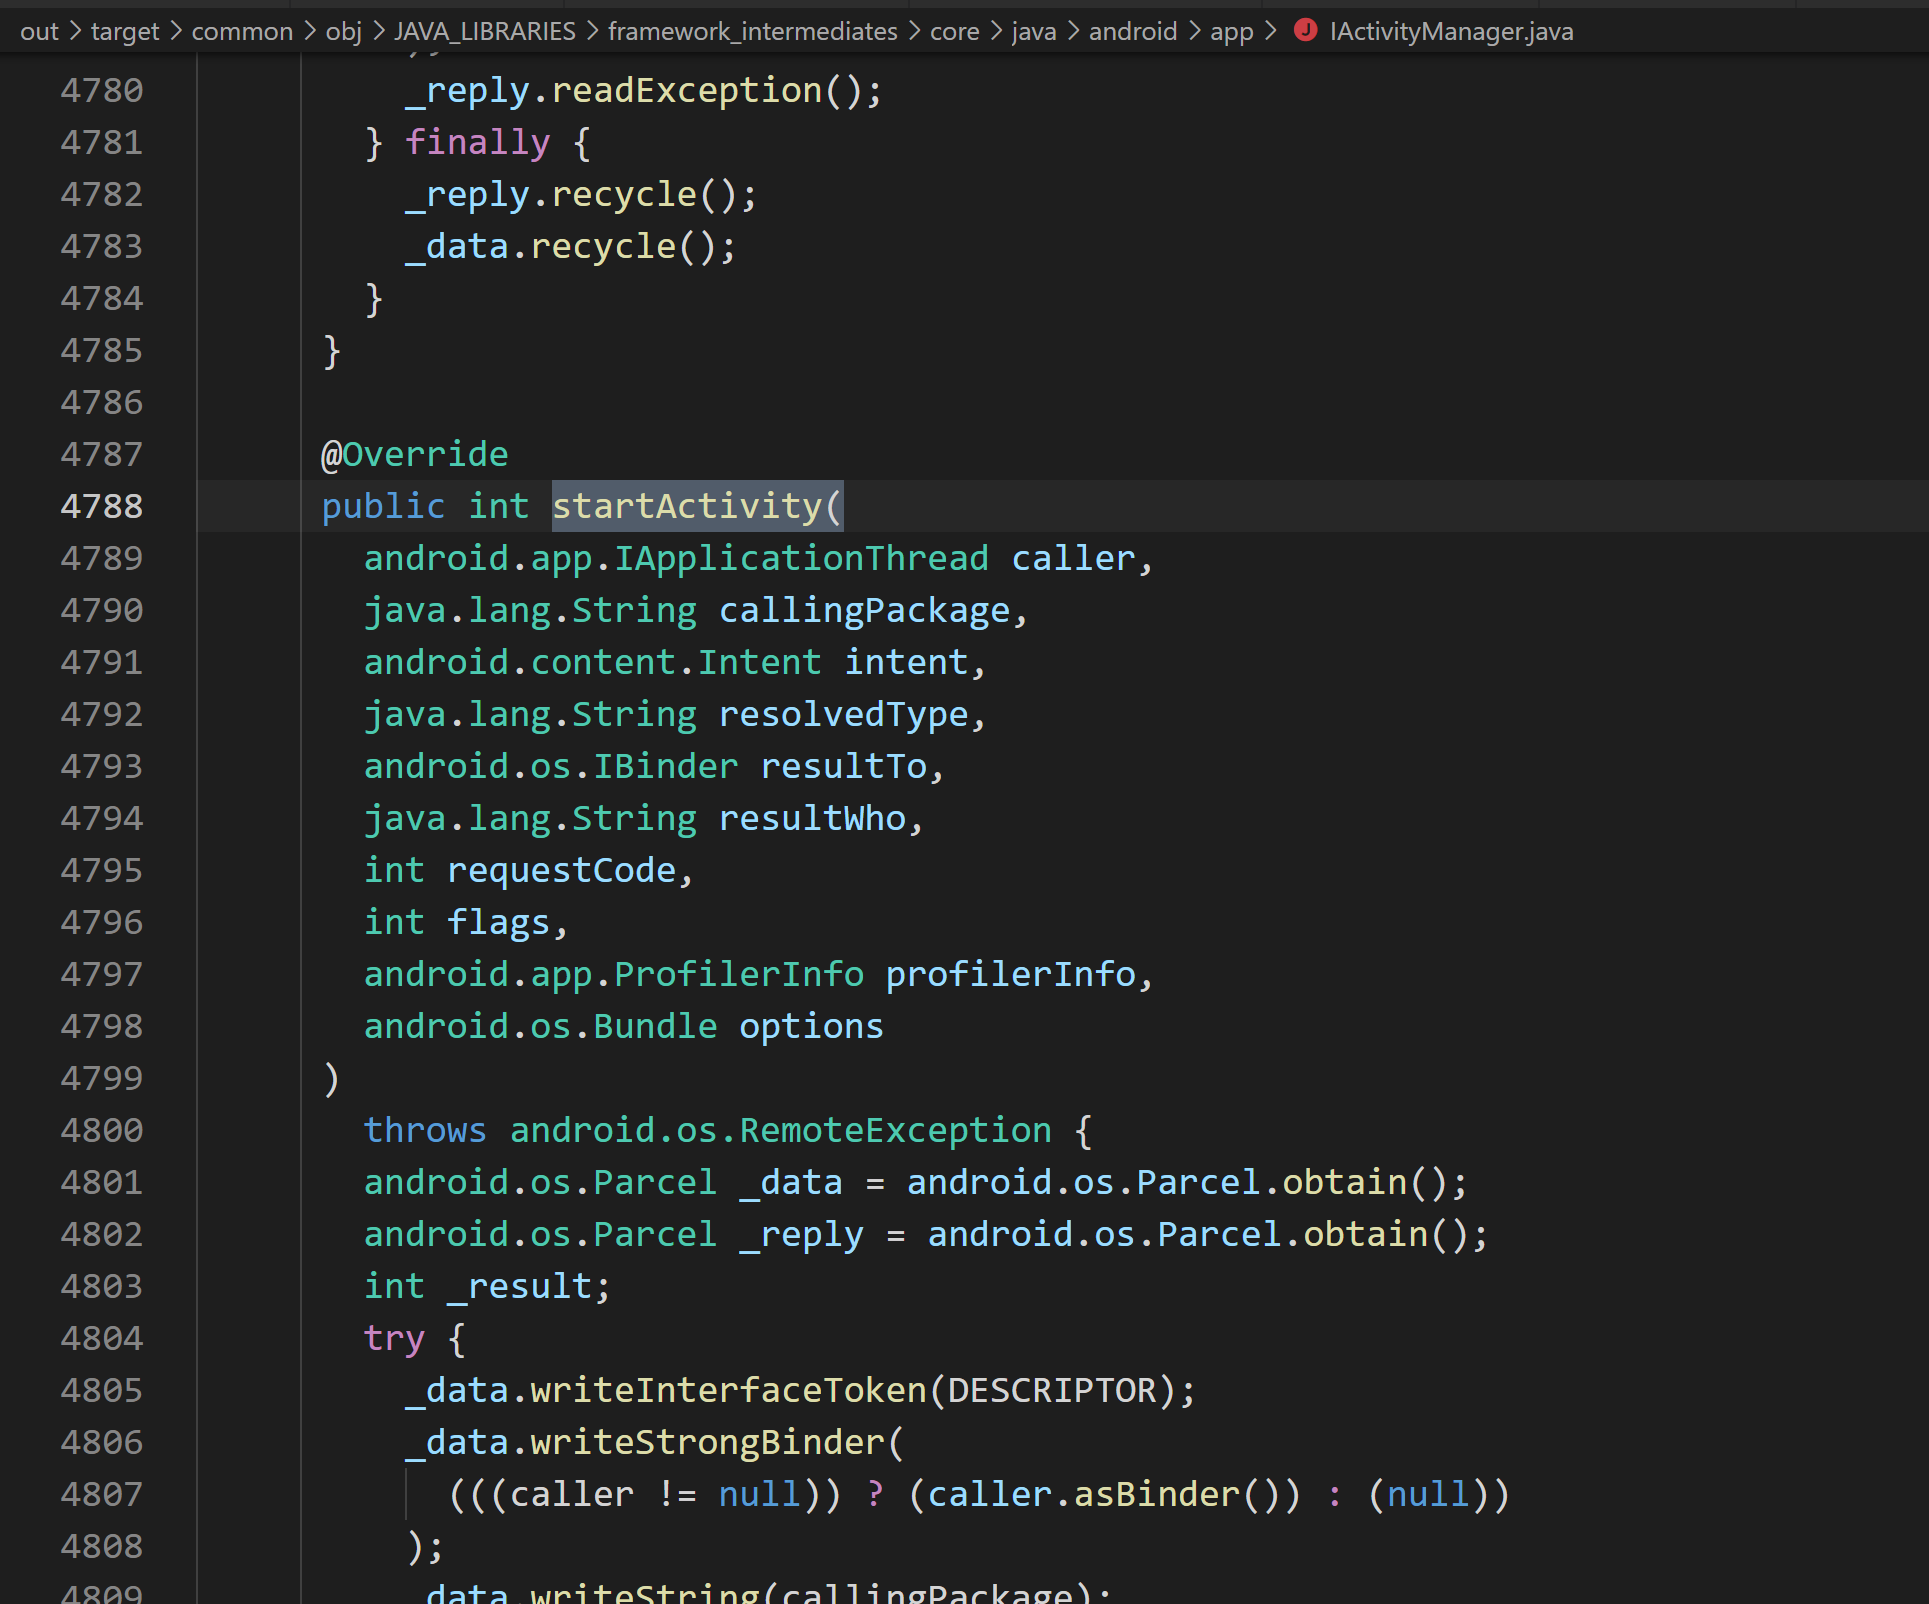
image-20221008212255821

列举一下参数

  1. 发起intent的进程的ApplicationThread对象

  2. 发起intent的app包名

  3. 具体的intent

  4. 涉及到一个resolveType

image-20221008212451926

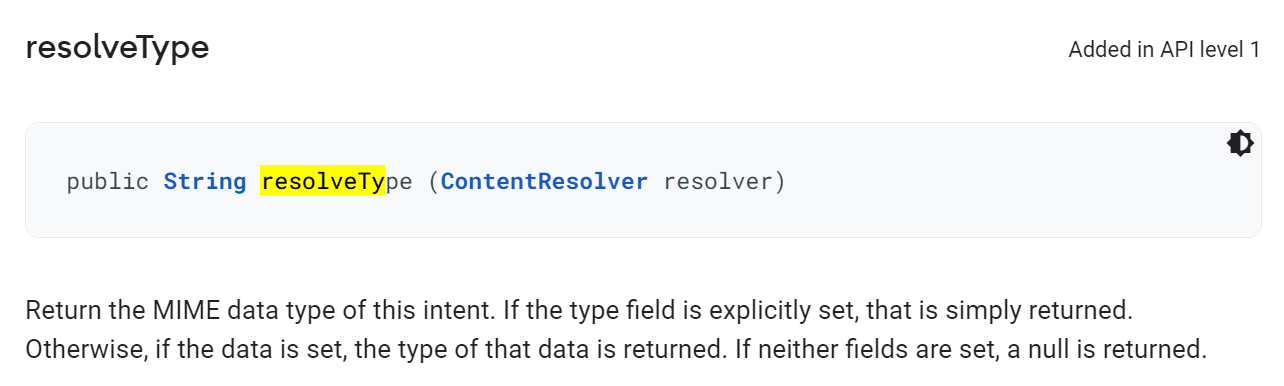
说的是返回intent的MIMEdata的类型

image-20221008212524442

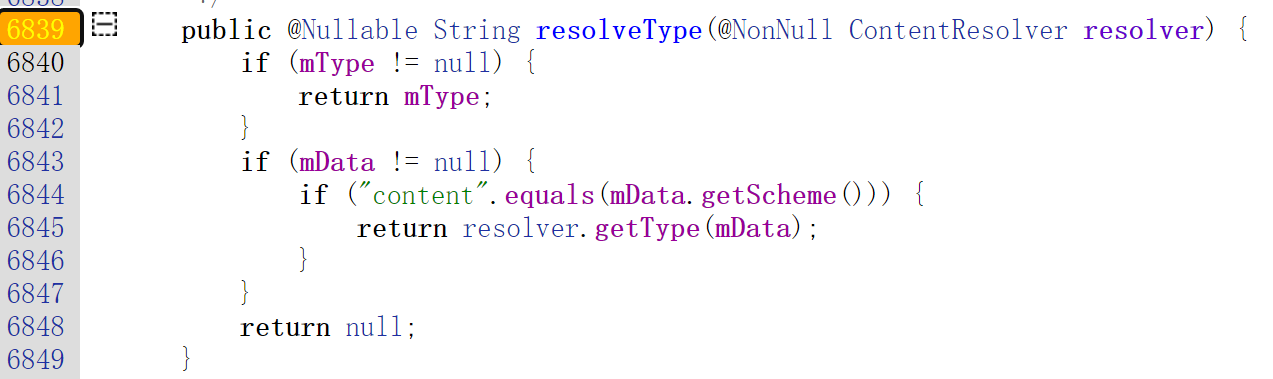
intent在传递MIME data数据时,是需要指定data type来作匹配用的,看个例子

image-20221008212550476

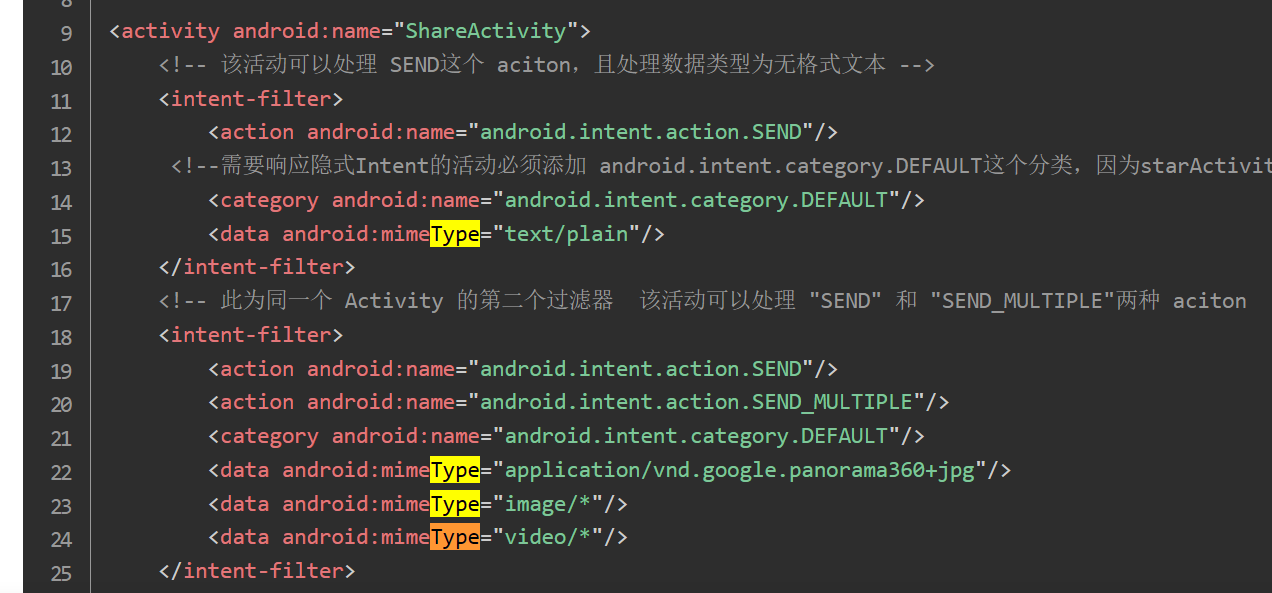
Activity的过滤器里可以设置这个东西,所以这里是得到intent设置的MIMEtype

  1. 一个ActivityRecord对象,指向AMS内部,是Launcher组件的详细信息
  2. 发起动作的Activity的mEmbeddedID
  3. requestCode
  4. flags等于0

这里调用完就来到AMS的startActivity里面

AMS端的startActivity

AMS对应的实现类是ActivityManagerServer

image-20221008214939157

1
2
3
4
5
6
7
8
9
10
11
12
13
14
15
16
17
18
19
20
21
22
23
//入口startActivity
@Override
public final int startActivity(IApplicationThread caller, String callingPackage,
Intent intent, String resolvedType, IBinder resultTo, String resultWho, int requestCode,
int startFlags, ProfilerInfo profilerInfo, Bundle bOptions) {
return startActivityAsUser(caller, callingPackage, intent, resolvedType, resultTo,
resultWho, requestCode, startFlags, profilerInfo, bOptions,
UserHandle.getCallingUserId());
}


@Override
public final int startActivityAsUser(IApplicationThread caller, String callingPackage,
Intent intent, String resolvedType, IBinder resultTo, String resultWho, int requestCode,
int startFlags, ProfilerInfo profilerInfo, Bundle bOptions, int userId) {
enforceNotIsolatedCaller("startActivity");
userId = mUserController.handleIncomingUser(Binder.getCallingPid(), Binder.getCallingUid(),
userId, false, ALLOW_FULL_ONLY, "startActivity", null);
// TODO: Switch to user app stacks here.
return mActivityStarter.startActivityMayWait(caller, -1, callingPackage, intent,
resolvedType, null, null, resultTo, resultWho, requestCode, startFlags,
profilerInfo, null, null, bOptions, false, userId, null, "startActivityAsUser");
}

这里是8.0里面多出的ActivityStarter,书上的是activityStack

image-20221008215933922

这个类的解释,看来其就负责解析intent和flags 来决定怎么启动activity

image-20221008220015405

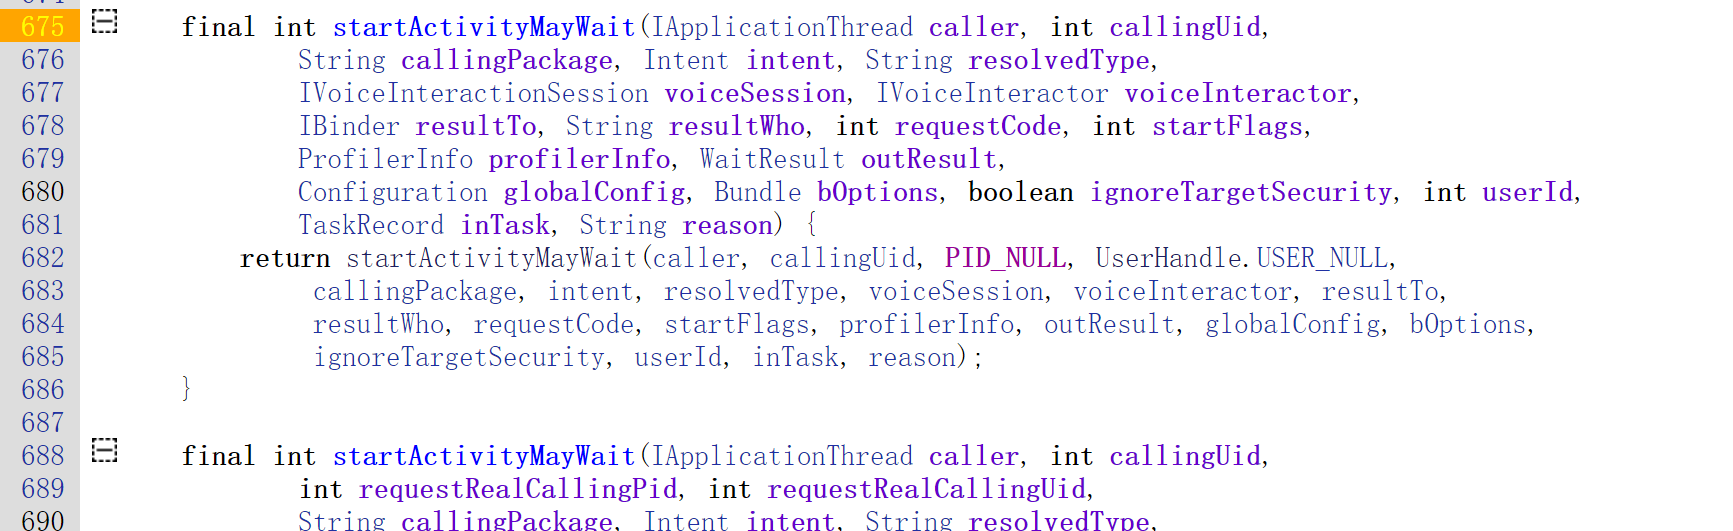
这俩函数,区别在于第四个参数是不是intent

1
2
3
4
5
6
7
8
9
10
11
12
13
14
15
16
17
18
19
20
21
22
23
24
25
26
27
28
29
30
31
32
33
34
35
36
37
38
39
40
41
42
147      private final ActivityManagerService mService;
148 private final ActivityStackSupervisor mSupervisor;


final int startActivityMayWait(IApplicationThread caller, int callingUid,
String callingPackage, Intent intent, String resolvedType,
IVoiceInteractionSession voiceSession, IVoiceInteractor voiceInteractor,
IBinder resultTo, String resultWho, int requestCode, int startFlags,
ProfilerInfo profilerInfo, WaitResult outResult,
Configuration globalConfig, Bundle bOptions, boolean ignoreTargetSecurity, int userId,
TaskRecord inTask, String reason) {


//解析intent
ResolveInfo rInfo = mSupervisor.resolveIntent(intent, resolvedType, userId);


//解析intent,关于目标Activity的信息都在aInfo里
ActivityInfo aInfo = mSupervisor.resolveActivity(intent, rInfo, startFlags, profilerInfo);
synchronized (mService) {
final int realCallingPid = Binder.getCallingPid();
final int realCallingUid = Binder.getCallingUid();
int callingPid;
if (callingUid >= 0) {
callingPid = -1;
} else if (caller == null) {
callingPid = realCallingPid;
callingUid = realCallingUid;
} else {
callingPid = callingUid = -1;
}
//得到目标正在活动的ActivityStack
final ActivityStack stack = mSupervisor.mFocusedStack;

final ActivityRecord[] outRecord = new ActivityRecord[1];
//调用成员函数继续执行启动Activity组件的工作
int res = startActivityLocked(caller, intent, ephemeralIntent, resolvedType,
aInfo, rInfo, voiceSession, voiceInteractor,
resultTo, resultWho, requestCode, callingPid,
callingUid, callingPackage, realCallingPid, realCallingUid, startFlags,
options, ignoreTargetSecurity, componentSpecified, outRecord, inTask,
reason);

这里mSuperVisor又是干什么的

image-20221008220858263

(38条消息) ActivityStackSupervisor,ActivityStack,ActivityRecord,TaskRecord的关系_跑步_跑步的博客-CSDN博客_activitystack

ActivityStackSupervior和ActivityStack

ActivityStackSupervior是用来管理ActivityStack的

而ActivityStack是 用来管理系统所有的Activity的,其内部维护了Activity的所有状态、特殊状态的Activity以及和Activity相关的列表数据。

supervisor里有多种ActivityStack实例

1
2
3
4
5
6
7
8
9
10
11
327      /** The stack containing the launcher app. Assumed to always be attached to
328 * Display.DEFAULT_DISPLAY. */
329 ActivityStack mHomeStack;
330
331 /** The stack currently receiving input or launching the next activity. */
332 ActivityStack mFocusedStack;
333
334 /** If this is the same as mFocusedStack then the activity on the top of the focused stack has
335 * been resumed. If stacks are changing position this will hold the old stack until the new
336 * stack becomes resumed after which it will be set to mFocusedStack. */
337 private ActivityStack mLastFocusedStack;

mHomeStack用来存储LauncherApp的所有的Activity,

mFocusStack表示当前正在接收输入或启动下一个Activity的所有Activity

mLastFocusStack表示此前输入的所有Activity

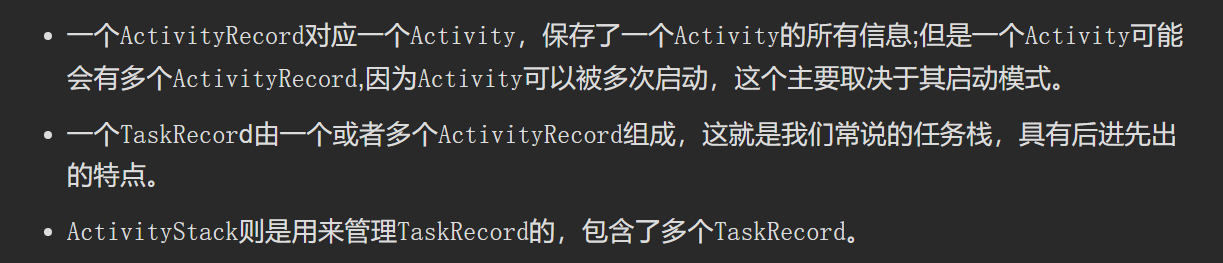
所以其实就是ActivityStack > TaskStack > Activity

ActivityRecord记录一个Activity的所有信息,TaskRecord记录TaskStack的信息
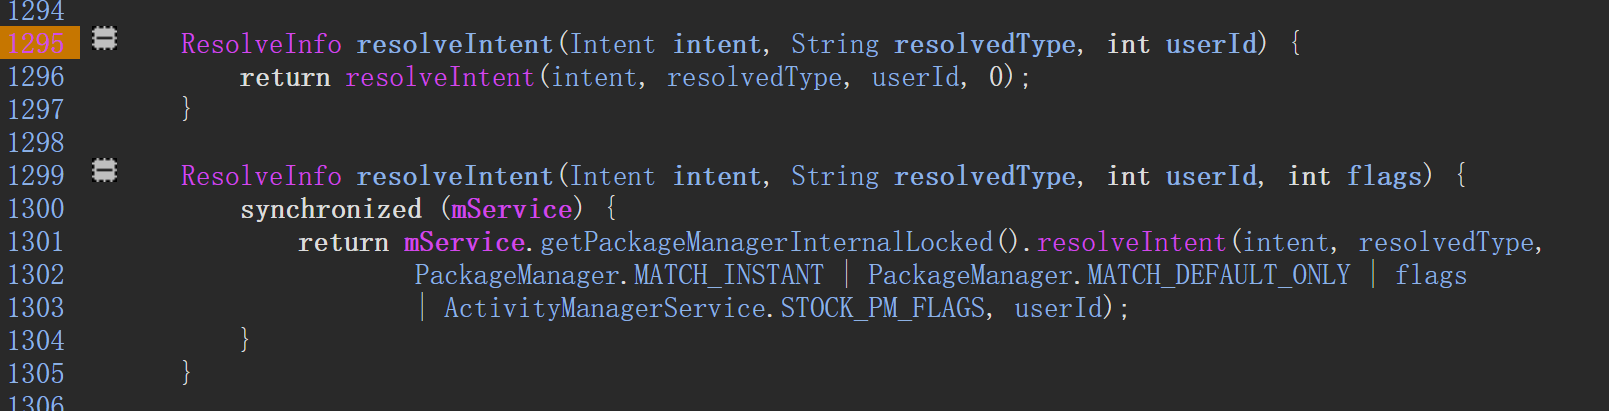
resolveIntent

1
2
//解析intent
ResolveInfo rInfo = mSupervisor.resolveIntent(intent, resolvedType, userId);

分析一下这里是怎么解析Intent的

image-20221008222637534

这里得到PM是在LocalService里得到的,这个LocalServices在其他部分也多次分析过

image-20221008222825749

image-20221008223150221

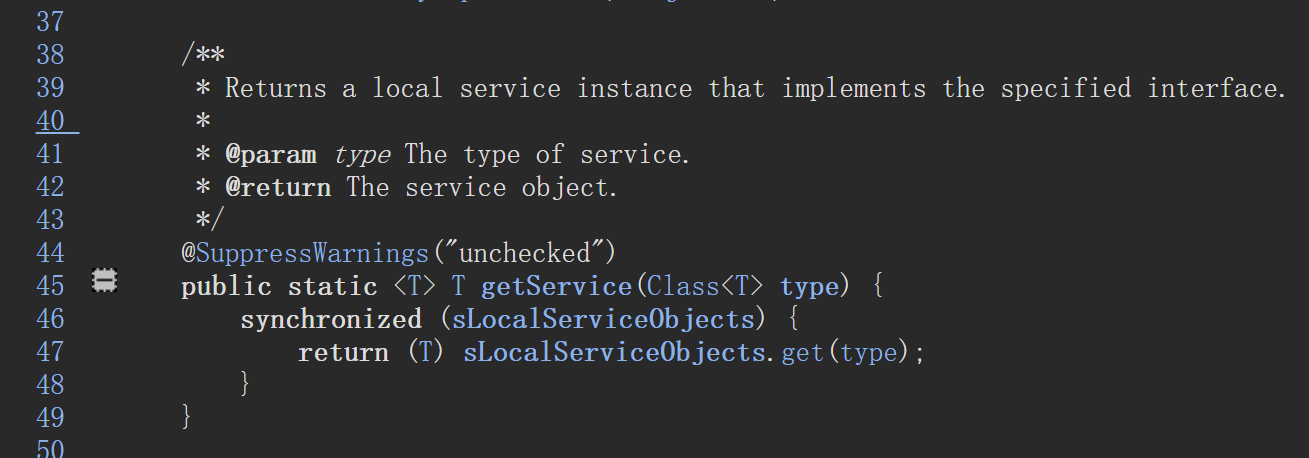
其就是用一个ArrayMap维护的当前本地服务对象,直接搜索引用可以找到添加服务的地方,这段代码在PMS里

image-20221008223214756

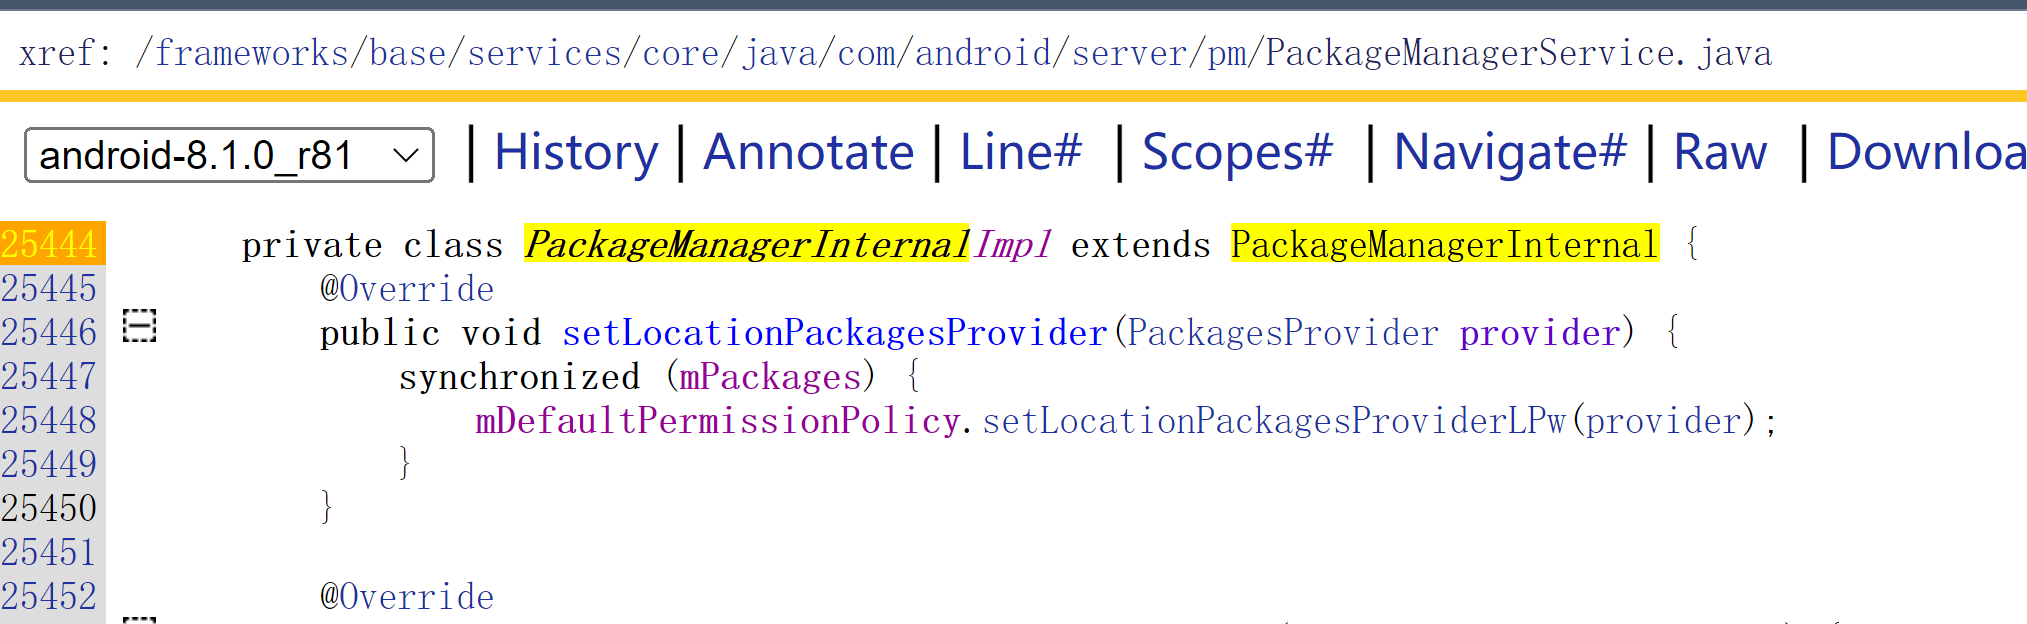
可能这里会奇怪一下,PMS加的本地服务,AMS怎么访问获得?但其实不要忘了AMS、PMS本来就是在一个进程里面。

这个Impl类就在PackageManagerService.java里面

image-20221008224105901

1
2
3
4
5
6
7
8
9
10
11
12
13
14
15
16
17
18
    @Override
public ResolveInfo resolveIntent(Intent intent, String resolvedType,
int flags, int userId) {
return resolveIntentInternal(
intent, resolvedType, flags, userId, true /*resolveForStart*/);
}


//最终的resolveIntentInternal
private ResolveInfo resolveIntentInternal(Intent intent, String resolvedType,
int flags, int userId, boolean resolveForStart) {
flags = updateFlagsForResolve(flags, userId, intent, callingUid, resolveForStart);
final List<ResolveInfo> query = queryIntentActivitiesInternal(intent, resolvedType,flags, callingUid, userId, resolveForStart, true /*allowDynamicSplits*/);


final ResolveInfo bestChoice =
chooseBestActivity(intent, resolvedType, flags, query, userId);
return bestChoice;

这里回溯ResolveType是传进来的mimeType

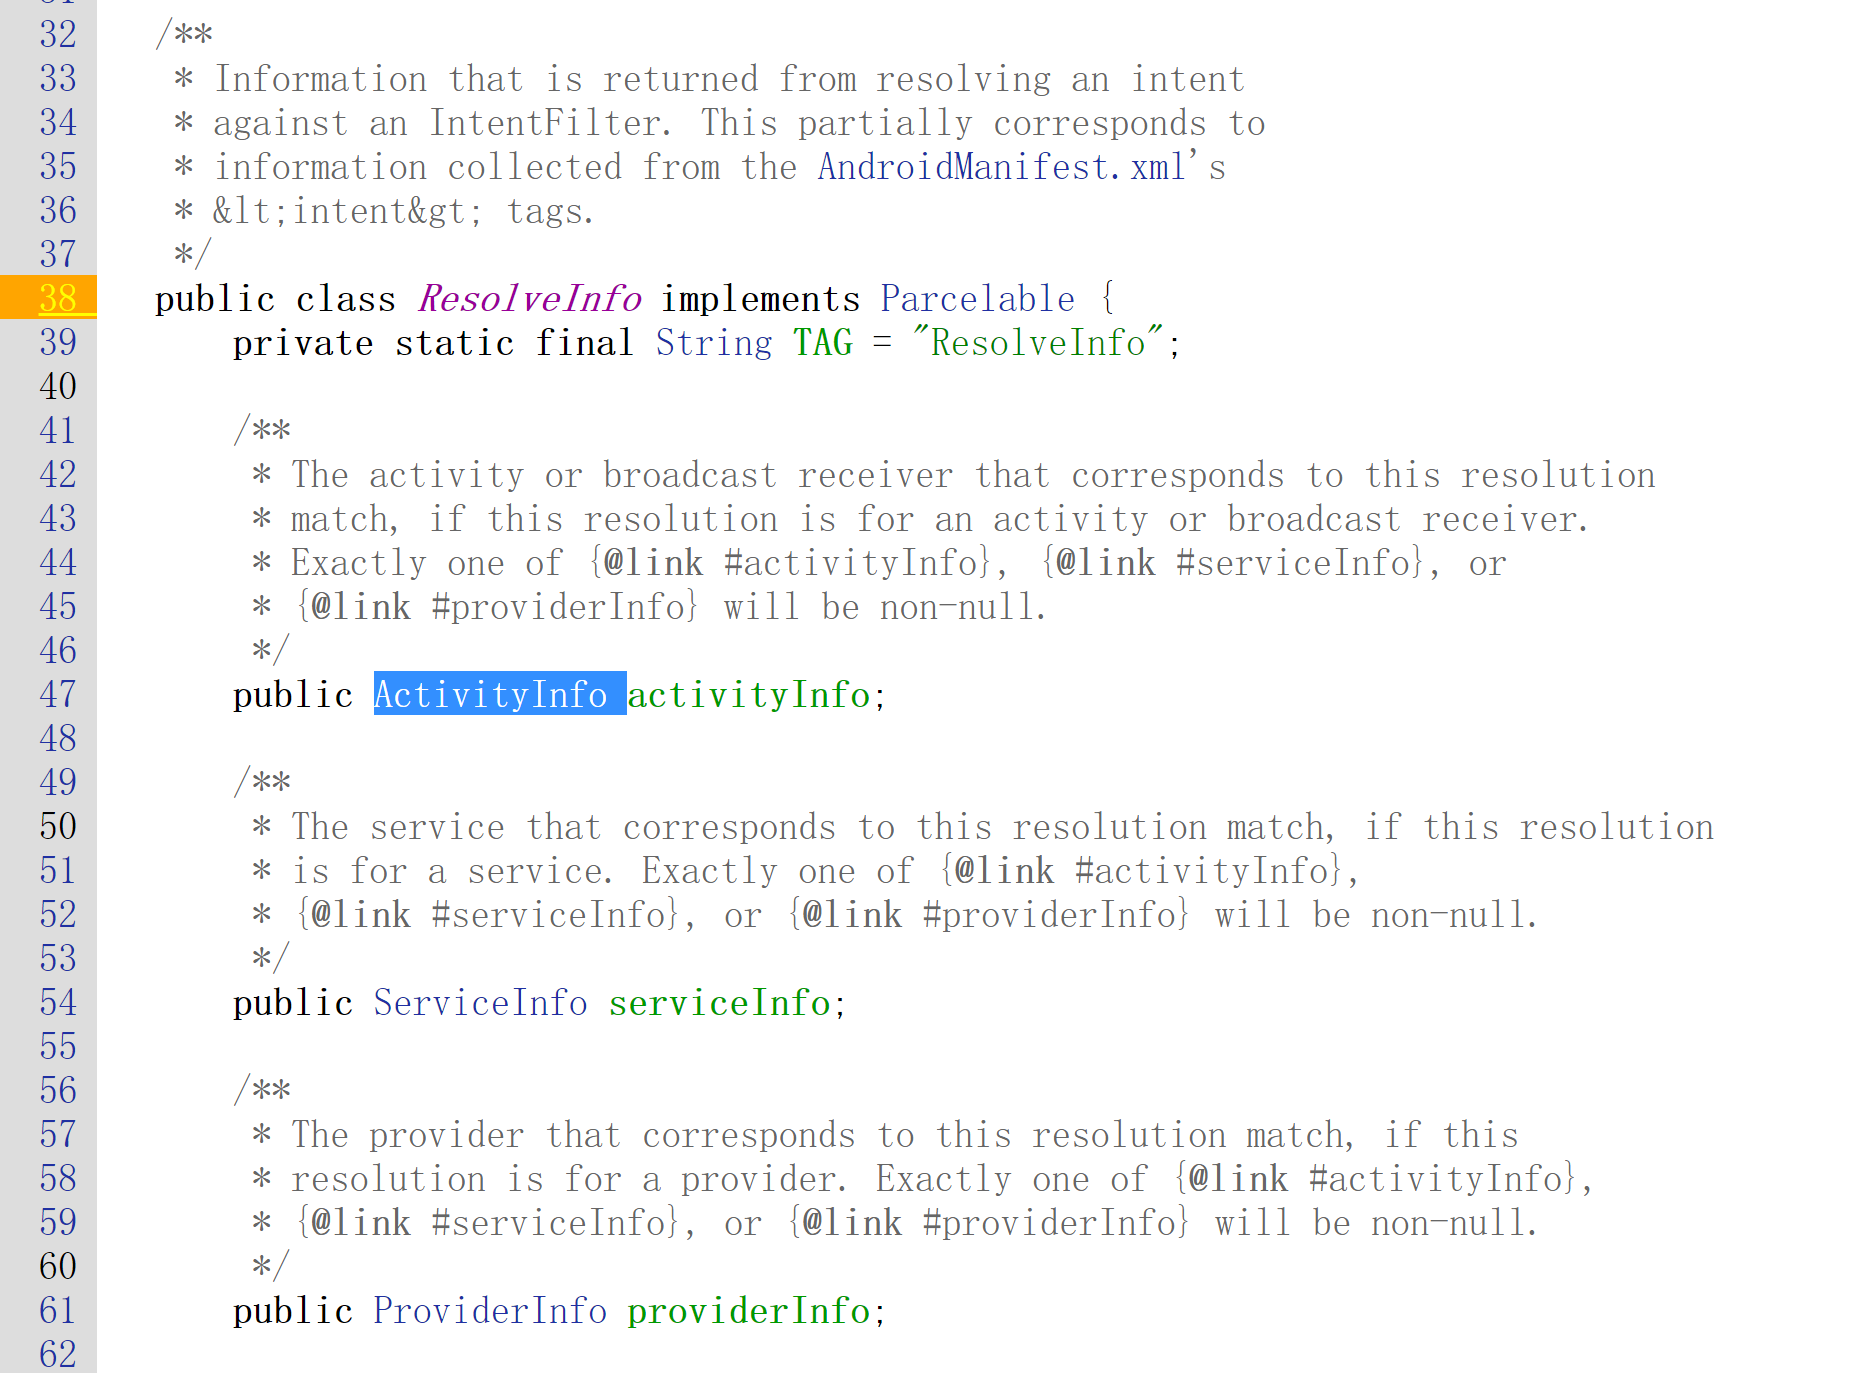
可以看到这里的逻辑实际就是根据intent去PMS里面查找最匹配的组件,然后封装成ResolveInfo返回

ResolveInfo里面包含的就是ActivityInfo 、ServiceInfo这些四大组件的信息,就对上PMS在安装APK时解析的信息

image-20221008224924409

image-20221008224945296

Android中隐式Intent的匹配规则源码分析 - 掘金 (juejin.cn)

具体是怎么解析的,回头再分析吧

回到startActivityLocked

1
2
3
4
5
6
7
8
9
10
11
12
13
14
15
16
17
18
19
20
21
22
23
24
25
26
27
28
29
30
31
32
33
34
35
36
int startActivityLocked(IApplicationThread caller, Intent intent, Intent ephemeralIntent,
String resolvedType, ActivityInfo aInfo, ResolveInfo rInfo,
IVoiceInteractionSession voiceSession, IVoiceInteractor voiceInteractor,
IBinder resultTo, String resultWho, int requestCode, int callingPid, int callingUid,
String callingPackage, int realCallingPid, int realCallingUid, int startFlags,
ActivityOptions options, boolean ignoreTargetSecurity, boolean componentSpecified,
ActivityRecord[] outActivity, TaskRecord inTask, String reason) {


mLastStartActivityResult = startActivity(caller, intent, ephemeralIntent, resolvedType,
aInfo, rInfo, voiceSession, voiceInteractor, resultTo, resultWho, requestCode,
callingPid, callingUid, callingPackage, realCallingPid, realCallingUid, startFlags,
options, ignoreTargetSecurity, componentSpecified, mLastStartActivityRecord,
inTask);


//startActivity
/** DO NOT call this method directly. Use {@link #startActivityLocked} instead. */
private int startActivity(IApplicationThread caller, Intent intent, Intent ephemeralIntent,
String resolvedType, ActivityInfo aInfo, ResolveInfo rInfo,
IVoiceInteractionSession voiceSession, IVoiceInteractor voiceInteractor,
IBinder resultTo, String resultWho, int requestCode, int callingPid, int callingUid,
String callingPackage, int realCallingPid, int realCallingUid, int startFlags,
ActivityOptions options, boolean ignoreTargetSecurity, boolean componentSpecified,
ActivityRecord[] outActivity, TaskRecord inTask) {
int err = ActivityManager.START_SUCCESS;


//每个应用程序进程都用一个ProcessRecord描述
ProcessRecord callerApp = null;
//获取与参数caller对应的ProcessRecord对象callerAPP
//caller指向的是Launcher所运行在的应用进程的一个ApplicationThread对象
if (caller != null) {
callerApp = mService.getRecordForAppLocked(caller);

这里caller传进来的是Launcher的ApplicationThread的代理对象,先通过其找到ProcessRecord·

1
2
3
4
5
6
7
8
9
10
11
12
13
14
15
16
17
18
19
20
21
22
23
24
25
26
27
28
29
30
//获得传进来的ApplicationThread代理对象对应的ProcessRecord
final ProcessRecord getRecordForAppLocked(
IApplicationThread thread) {
if (thread == null) {
return null;
}

int appIndex = getLRURecordIndexForAppLocked(thread);
if (appIndex >= 0) {
return mLruProcesses.get(appIndex);
}

// Validation: if it isn't in the LRU list, it shouldn't exist, but let's
// double-check that.
final IBinder threadBinder = thread.asBinder();
final ArrayMap<String, SparseArray<ProcessRecord>> pmap = mProcessNames.getMap();
for (int i = pmap.size()-1; i >= 0; i--) {
final SparseArray<ProcessRecord> procs = pmap.valueAt(i);
for (int j = procs.size()-1; j >= 0; j--) {
final ProcessRecord proc = procs.valueAt(j);
if (proc.thread != null && proc.thread.asBinder() == threadBinder) {
Slog.wtf(TAG, "getRecordForApp: exists in name list but not in LRU list: "
+ proc);
return proc;
}
}
}

return null;
}

从寻找方法就是从pmap里遍历ProcessRecord,然后对比其thread是否等于要找的IApplicationThread代理对象

1
2
3
4
5
6
7
8
9
10
11
12
13
14
15
//resultTo指向的是Launcher组件在AMS中的一个ActivityRecord对象
//获取ActivityRecord
ActivityRecord sourceRecord = null;
ActivityRecord resultRecord = null;
if (resultTo != null) {
//从ActivityStack中获取
sourceRecord = mSupervisor.isInAnyStackLocked(resultTo);
if (DEBUG_RESULTS) Slog.v(TAG_RESULTS,
"Will send result to " + resultTo + " " + sourceRecord);
if (sourceRecord != null) {
if (requestCode >= 0 && !sourceRecord.finishing) {
resultRecord = sourceRecord;
}
}
}

这里根据resultTo,也就是前面说的mToken,获得ActivityRecord,

image-20221009093123591

image-20221009093449828

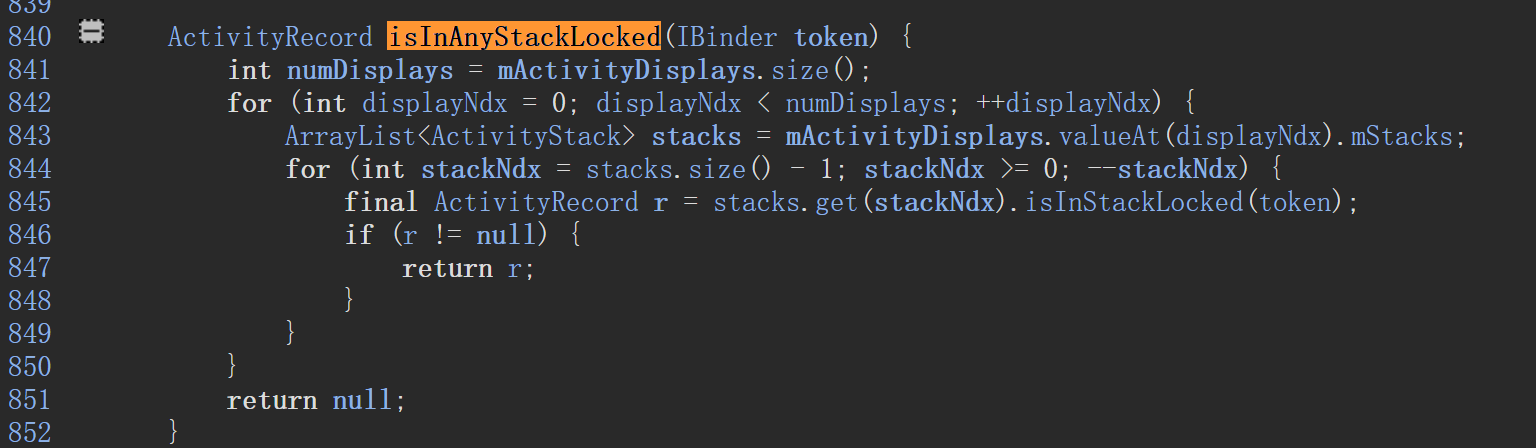
mActivityDisplays是ActivityDispaly类,其内部维护一个mStacks,就是活动栈

image-20221009093553927

所以这里就是双重循环遍历mActivityDisplays里的mStacks来查找对应的ActivityRecord

1
2
3
4
5
6
7
8
9
10
11
      //创建一个activityRecord描述即将要启动的Activity组件,即MainActivity
ActivityRecord r = new ActivityRecord(mService, callerApp, callingPid, callingUid,
callingPackage, intent, resolvedType, aInfo, mService.getGlobalConfiguration(),
resultRecord, resultWho, requestCode, componentSpecified, voiceSession != null,
mSupervisor, options, sourceRecord);
final ActivityStack stack = mSupervisor.mFocusedStack;


//r是目标Activity sourceRecord是原Activity 继续启动
return startActivity(r, sourceRecord, voiceSession, voiceInteractor, startFlags, true,
options, inTask, outActivity);

ActivityRecord

它是在AMS记录一个Activity的所有信息,在启动Activity时被创建,其本身并不是IBinder对象

1
2
3
4
185  /**
186 * An entry in the history stack, representing an activity.
187 */
188 final class ActivityRecord extends ConfigurationContainer implements AppWindowContainerListener {

而是其包含的一个内部类是Ibinder对象

1
2
3
4
5
6
7
8
748      static class Token extends IApplicationToken.Stub {
//指向一个ActivityRecord
749 private final WeakReference<ActivityRecord> weakActivity;
750
751 Token(ActivityRecord activity) {
752 weakActivity = new WeakReference<>(activity);
753 }
754

我们根据token来查找对应的ActivityRecord时,调用的是ActivityStack的isInStackLocked,其调用的是ActivityRecord的forTokenLocked

1
2
3
4
5
6
7
8
9
10
11
12
13
14
764      ActivityRecord isInStackLocked(IBinder token) {
765 final ActivityRecord r = ActivityRecord.forTokenLocked(token);
766 return isInStackLocked(r);
767 }


778 static ActivityRecord forTokenLocked(IBinder token) {
779 try {
780 return Token.tokenToActivityRecordLocked((Token)token);
781 } catch (ClassCastException e) {
782 Slog.w(TAG, "Bad activity token: " + token, e);
783 return null;
784 }
785 }

然后就来到Ibinder对象Token的静态函数,其就是获取token的成员weakActivity,也就是指向一个ActivityRecord对象

1
2
3
4
5
6
7
8
9
10
755          private static ActivityRecord tokenToActivityRecordLocked(Token token) {
756 if (token == null) {
757 return null;
758 }
759 ActivityRecord r = token.weakActivity.get();
760 if (r == null || r.getStack() == null) {
761 return null;
762 }
763 return r;
764 }

列举一下ActivityRecord里的重要的成员变量

1
2
3
4
5
6
7
final ActivityManagerService service; // owner  对AMS的引用
final ApplicationInfo appInfo; // information about activity's app 解析AndoridMenifest得到的Activit组件信息
final String launchedFromPackage; // always the package who started the activity. 启动Activity的包名
final String taskAffinity; // as per ActivityInfo.taskAffinity Activity归属的栈
private TaskRecord task; // the task this is in. ActivityRecord在的TaskRecord
ProcessRecord app; // if non-null, hosting application Activity所在的应用程序进程
ActivityState state; // current state we are in 当前Activity的状态

再回头看startActivity,层数太多了

1
2
3
4
5
6
7
8
9
10
11
12
13
14
15
16
17
18
19
20
21
22
23
24
25
26
27
28
29
30
31
32
33
34
35
36
37
38
39
40
41
42
43
44
45
46
47
48
49
50
51
52
53
54
private int startActivity(final ActivityRecord r, ActivityRecord sourceRecord,
IVoiceInteractionSession voiceSession, IVoiceInteractor voiceInteractor,
int startFlags, boolean doResume, ActivityOptions options, TaskRecord inTask,
ActivityRecord[] outActivity) {
//又进一层调用unchecked
result = startActivityUnchecked(r, sourceRecord, voiceSession, voiceInteractor,
startFlags, doResume, options, inTask, outActivity);


private int startActivityUnchecked(final ActivityRecord r, ActivityRecord sourceRecord,
IVoiceInteractionSession voiceSession, IVoiceInteractor voiceInteractor,
int startFlags, boolean doResume, ActivityOptions options, TaskRecord inTask,
ActivityRecord[] outActivity) {

//如果启动标志里有NEW_TASK就设置newtask标志等于true
if (mStartActivity.resultTo == null && mInTask == null && !mAddingToTask
&& (mLaunchFlags & FLAG_ACTIVITY_NEW_TASK) != 0) {
newTask = true;
//创建新的Task,内部会创建一个新的Activity任务栈,Activity任务栈实际上是一个假想的模型
result = setTaskFromReuseOrCreateNewTask(
taskToAffiliate, preferredLaunchStackId, topStack);

//mTargetStack就是ActivityStack类型
mTargetStack.startActivityLocked(mStartActivity, topFocused, newTask, mKeepCurTransition,
mOptions);
if (mDoResume) {
final ActivityRecord topTaskActivity =
mStartActivity.getTask().topRunningActivityLocked();
if (!mTargetStack.isFocusable()
|| (topTaskActivity != null && topTaskActivity.mTaskOverlay
&& mStartActivity != topTaskActivity)) {
// If the activity is not focusable, we can't resume it, but still would like to
// make sure it becomes visible as it starts (this will also trigger entry
// animation). An example of this are PIP activities.
// Also, we don't want to resume activities in a task that currently has an overlay
// as the starting activity just needs to be in the visible paused state until the
// over is removed.
mTargetStack.ensureActivitiesVisibleLocked(null, 0, !PRESERVE_WINDOWS);
// Go ahead and tell window manager to execute app transition for this activity
// since the app transition will not be triggered through the resume channel.
mWindowManager.executeAppTransition();
} else {
// If the target stack was not previously focusable (previous top running activity
// on that stack was not visible) then any prior calls to move the stack to the
// will not update the focused stack. If starting the new activity now allows the
// task stack to be focusable, then ensure that we now update the focused stack
// accordingly.
if (mTargetStack.isFocusable() && !mSupervisor.isFocusedStack(mTargetStack)) {
mTargetStack.moveToFront("startActivityUnchecked");
}
//接下来的流程
mSupervisor.resumeFocusedStackTopActivityLocked(mTargetStack, mStartActivity,mOptions);
}

这个函数就很乱了,现在也没有分析的太明白,首先可以看到其调用了setTaskFromReuseOrCreateNewTask创建一个新的TaskRecord任务栈,因为我们Launcher启动根Activity里指定的NEW_TASK

Android深入四大组件(四)Android8.0 根Activity启动过程(前篇) - 安卓笔记侠 - 博客园 (cnblogs.com)

然后调用的就是这个resumeFocusedStackTopActivity

1
mSupervisor.resumeFocusedStackTopActivityLocked(mTargetStack, mStartActivity,mOptions);
1
2
3
4
5
6
7
8
9
10
11
12
13
14
15
16
17
18
19
20
21
boolean resumeFocusedStackTopActivityLocked(
ActivityStack targetStack, ActivityRecord target, ActivityOptions targetOptions) {

if (!readyToResume()) {
return false;
}

if (targetStack != null && isFocusedStack(targetStack)) {
return targetStack.resumeTopActivityUncheckedLocked(target, targetOptions);
}
//获取要启动的Activiy所在栈的栈顶的不是处于停止状态的ActivityREcord
final ActivityRecord r = mFocusedStack.topRunningActivityLocked();
if (r == null || r.state != RESUMED) {
mFocusedStack.resumeTopActivityUncheckedLocked(null, null);
} else if (r.state == RESUMED) {
// Kick off any lingering app transitions form the MoveTaskToFront operation.
mFocusedStack.executeAppTransition(targetOptions);
}

return false;
}

这里我们刚创建的TaskRecord的栈顶就是我们要启动的Activity,这里获得其状态肯定不是Resumed,所以走的就是resumeTopActivityUncheckLocked

1
2
3
4
5
6
7
8
9
10
11
12
13
14
boolean resumeTopActivityUncheckedLocked(ActivityRecord prev, ActivityOptions options) {
if (mStackSupervisor.inResumeTopActivity) {
// Don't even start recursing.
return false;
}

boolean result = false;
try {
// Protect against recursion.
mStackSupervisor.inResumeTopActivity = true;
result = resumeTopActivityInnerLocked(prev, options);
} finally {
mStackSupervisor.inResumeTopActivity = false;
}

这个Inner代码也是特别长,其中只需要关注调用了startPausingLocked和startSpecificActivityLocked

startPausingLocked是向Launcher发送通知,让其进入Paused状态

1
2
3
4
5
6
7
8
9
10
11
12
13
14
15
16
17
18
19
20
21
22
23
24
25
26
27
final boolean startPausingLocked(boolean userLeaving, boolean uiSleeping,
ActivityRecord resuming, boolean pauseImmediately) {
if (mPausingActivity != null) {
Slog.wtf(TAG, "Going to pause when pause is already pending for " + mPausingActivity
+ " state=" + mPausingActivity.state);
if (!shouldSleepActivities()) {
// Avoid recursion among check for sleep and complete pause during sleeping.
// Because activity will be paused immediately after resume, just let pause
// be completed by the order of activity paused from clients.
completePauseLocked(false, resuming);
}
}
//获得当前活动的Activity,也就是要发送暂停的目标
ActivityRecord prev = mResumedActivity;


if (prev.app != null && prev.app.thread != null) {
if (DEBUG_PAUSE) Slog.v(TAG_PAUSE, "Enqueueing pending pause: " + prev);
try {
EventLog.writeEvent(EventLogTags.AM_PAUSE_ACTIVITY,
prev.userId, System.identityHashCode(prev),
prev.shortComponentName);
mService.updateUsageStats(prev, false);
//调用ApplicationThread代理对象的SchedulePauseActivity
prev.app.thread.schedulePauseActivity(prev.appToken, prev.finishing,
userLeaving, prev.configChangeFlags, pauseImmediately);

ActivityRecord的成员变量是ProcessRecord,其成员变量thread就是ApplicationThread代理对象

这里调用其schedulePauseActivity,其就是向消息队列里发了一个PAUSE_ACTIVITY消息

1
2
3
4
5
6
7
8
9
10
11
12
public final void schedulePauseActivity(IBinder token, boolean finished,
boolean userLeaving, int configChanges, boolean dontReport) {
int seq = getLifecycleSeq();
if (DEBUG_ORDER) Slog.d(TAG, "pauseActivity " + ActivityThread.this
+ " operation received seq: " + seq);
sendMessage(
finished ? H.PAUSE_ACTIVITY_FINISHING : H.PAUSE_ACTIVITY,
token,
(userLeaving ? USER_LEAVING : 0) | (dontReport ? DONT_REPORT : 0),
configChanges,
seq);
}

来到消息队列的case

1
2
3
4
5
6
7
8
9
10
11
12
13
14
15
16
17
18
19
20
21
22
23
24
25
26
27
28
29
30
31
32
33
34
35
36
37
38
39
40
41
42
43
44
45
            case PAUSE_ACTIVITY: {
Trace.traceBegin(Trace.TRACE_TAG_ACTIVITY_MANAGER, "activityPause");
SomeArgs args = (SomeArgs) msg.obj;
handlePauseActivity((IBinder) args.arg1, false,
(args.argi1 & USER_LEAVING) != 0, args.argi2,
(args.argi1 & DONT_REPORT) != 0, args.argi3);
Trace.traceEnd(Trace.TRACE_TAG_ACTIVITY_MANAGER);
} break;


private void handlePauseActivity(IBinder token, boolean finished,
boolean userLeaving, int configChanges, boolean dontReport, int seq) {
//得到要停止的ActivityClientRecord对象
ActivityClientRecord r = mActivities.get(token);
if (DEBUG_ORDER) Slog.d(TAG, "handlePauseActivity " + r + ", seq: " + seq);
if (!checkAndUpdateLifecycleSeq(seq, r, "pauseActivity")) {
return;
}
if (r != null) {
//Slog.v(TAG, "userLeaving=" + userLeaving + " handling pause of " + r);
if (userLeaving) {
performUserLeavingActivity(r);
}

r.activity.mConfigChangeFlags |= configChanges;
//进一步调用
performPauseActivity(token, finished, r.isPreHoneycomb(), "handlePauseActivity");

// Make sure any pending writes are now committed.
if (r.isPreHoneycomb()) {
QueuedWork.waitToFinish();
}

// Tell the activity manager we have paused.
if (!dontReport) {
try {
//告诉AMS,该Activity已经Paused
ActivityManager.getService().activityPaused(token);
} catch (RemoteException ex) {
throw ex.rethrowFromSystemServer();
}
}
mSomeActivitiesChanged = true;
}
}

这里不继续跟进了,描述一下过程,在应用程序中的Activity组件都用一个ActivityClientRecord来描述,这些Record对象对应AMS里面的ActivityRecord对象,保存在Activty的mActivites成员中

handlePauseActivity干了三件事

  • 向Launcher发送一个用户离开事件通知,即调用其成员函数onUserLeaveHint
  • 向Launcher发送一个中止事件通知,即调用其onPause
  • 调用waitToFinish完成数据写入操作,

再回到前面,Launcher被Pause之后,就该启动栈顶的目标Activity了

1
2
3
4
5
6
7
8
9
10
11
        //需要暂停当前活动的Activity以至于可以resumed栈顶的Activity
if (mResumedActivity != null) {
if (DEBUG_STATES) Slog.d(TAG_STATES,
"resumeTopActivityLocked: Pausing " + mResumedActivity);
pausing |= startPausingLocked(userLeaving, false, next, false);
}


//关键的是这句,启动栈顶的Actvity

mStackSupervisor.startSpecificActivityLocked(next, true, true);
1
2
3
4
5
6
7
8
9
10
11
12
13
14
15
16
17
18
19
20
21
22
23
24
25
26
27
28
29
30
31
32
33
34
  void startSpecificActivityLocked(ActivityRecord r,
boolean andResume, boolean checkConfig) {
// Is this activity's application already running?
//获取将要启动的Activity所在的应用程序进程
ProcessRecord app = mService.getProcessRecordLocked(r.processName,
r.info.applicationInfo.uid, true);

r.getStack().setLaunchTime(r);
//要启动的Activity所在的应用程序进程已经运行的话,就调用realStartActvityLocked
if (app != null && app.thread != null) {
try {
if ((r.info.flags&ActivityInfo.FLAG_MULTIPROCESS) == 0
|| !"android".equals(r.info.packageName)) {
// Don't add this if it is a platform component that is marked
// to run in multiple processes, because this is actually
// part of the framework so doesn't make sense to track as a
// separate apk in the process.
app.addPackage(r.info.packageName, r.info.applicationInfo.versionCode,
mService.mProcessStats);
}
realStartActivityLocked(r, app, andResume, checkConfig);
return;
} catch (RemoteException e) {
Slog.w(TAG, "Exception when starting activity "
+ r.intent.getComponent().flattenToShortString(), e);
}

// If a dead object exception was thrown -- fall through to
// restart the application.
}
//进程还没创建,就新建一个Process
mService.startProcessLocked(r.processName, r.info.applicationInfo, true, 0,
"activity", r.intent.getComponent(), false, false, true);
}

因为我们要启动的MainActvity的进程还没有启动,所以会先调用startProcess来启一个新进程,参数是用户ID和进程名称,然后再通知这个应用程序进程将该Activity组件启动起来

1
2
3
4
5
6
7
8
9
10
11
12
13
14
15
16
17
18
19
20
21
22
23
24
25
26
27
28
29
30
31
32
33
34
final ProcessRecord startProcessLocked(String processName,
ApplicationInfo info, boolean knownToBeDead, int intentFlags,
String hostingType, ComponentName hostingName, boolean allowWhileBooting,
boolean isolated, boolean keepIfLarge) {
return startProcessLocked(processName, info, knownToBeDead, intentFlags, hostingType,
hostingName, allowWhileBooting, isolated, 0 /* isolatedUid */, keepIfLarge,
null /* ABI override */, null /* entryPoint */, null /* entryPointArgs */,
null /* crashHandler */);
}


startProcessLocked(
app, hostingType, hostingNameStr, abiOverride, entryPoint, entryPointArgs);


//启动新进程
boolean isActivityProcess = (entryPoint == null);
if (entryPoint == null) entryPoint = "android.app.ActivityThread";

ProcessStartResult startResult;
if (hostingType.equals("webview_service")) {
startResult = startWebView(entryPoint,
app.processName, uid, uid, gids, debugFlags, mountExternal,
app.info.targetSdkVersion, seInfo, requiredAbi, instructionSet,
app.info.dataDir, null, entryPointArgs);
} else {
//启动新进程
startResult = Process.start(entryPoint,
app.processName, uid, uid, gids, debugFlags, mountExternal,
app.info.targetSdkVersion, seInfo, requiredAbi, instructionSet,
app.info.dataDir, invokeWith, entryPointArgs);
}

调用完Process。start之后还得向消息队列里面发送一个消息PROC_START_TIMEOUT_MSG,等待新创建的应用程序进程返回消息,这里设置了TIMEOUT,也就是必须在指定时间内完成调用

1
2
3
4
5
6
7
8
9
10
11
//向线程队列中发送一个PROC_START_TIMEOUT_MSG,新的应用程序进程必须在PROC_START_TIMEOUT毫秒内完成启动工作
//并发送一个通知
synchronized (mPidsSelfLocked) {
this.mPidsSelfLocked.put(startResult.pid, app);
if (isActivityProcess) {
Message msg = mHandler.obtainMessage(PROC_START_TIMEOUT_MSG);
msg.obj = app;
mHandler.sendMessageDelayed(msg, startResult.usingWrapper
? PROC_START_TIMEOUT_WITH_WRAPPER : PROC_START_TIMEOUT);
}
}

现在就来看看应用进程启动的过程,这个代码在ActivityThread中

ApplicationThread端 main

Process.start里指定的类就是ActivityThread,所以这里入口点就是main

1
2
3
4
5
6
7
8
9
10
11
12
13
14
15
16
17
18
19
20
21
22
23
24
25
26
27
28
29
30
31
32
33
34
35
36
37
38
39
40
41
final ApplicationThread mAppThread = new ApplicationThread();

public static void main(String[] args) {
Trace.traceBegin(Trace.TRACE_TAG_ACTIVITY_MANAGER, "ActivityThreadMain");

// CloseGuard defaults to true and can be quite spammy. We
// disable it here, but selectively enable it later (via
// StrictMode) on debug builds, but using DropBox, not logs.
CloseGuard.setEnabled(false);

Environment.initForCurrentUser();

// Set the reporter for event logging in libcore
EventLogger.setReporter(new EventLoggingReporter());

// Make sure TrustedCertificateStore looks in the right place for CA certificates
final File configDir = Environment.getUserConfigDirectory(UserHandle.myUserId());
TrustedCertificateStore.setDefaultUserDirectory(configDir);

Process.setArgV0("<pre-initialized>");
//创建一个消息循环,向AMS发送启动完成的通知之后,就会进入这个循环
Looper.prepareMainLooper();
//创建ActivityThread实例
ActivityThread thread = new ActivityThread();
thread.attach(false);

if (sMainThreadHandler == null) {
sMainThreadHandler = thread.getHandler();
}

if (false) {
Looper.myLooper().setMessageLogging(new
LogPrinter(Log.DEBUG, "ActivityThread"));
}

// End of event ActivityThreadMain.
Trace.traceEnd(Trace.TRACE_TAG_ACTIVITY_MANAGER);
Looper.loop();

throw new RuntimeException("Main thread loop unexpectedly exited");
}

这个函数就是创建ActivityThread,以及创建一个消息循环,在thread.attach中调用AMS的attachApplication,把这个新建进程的ApplicationThread代理传递过去

1
2
3
4
5
6
7
8
9
10
11
12
13
14
15
16
17
18
19
20
private void attach(boolean system) {
sCurrentActivityThread = this;
mSystemThread = system;
if (!system) {
ViewRootImpl.addFirstDrawHandler(new Runnable() {
@Override
public void run() {
ensureJitEnabled();
}
});
android.ddm.DdmHandleAppName.setAppName("<pre-initialized>",
UserHandle.myUserId());
RuntimeInit.setApplicationObject(mAppThread.asBinder());
//Binder通信,调用AMS的attachAppliaction,传递ApplicationTHread对象
final IActivityManager mgr = ActivityManager.getService();
try {
mgr.attachApplication(mAppThread);
} catch (RemoteException ex) {
throw ex.rethrowFromSystemServer();
}

然后又来到AMS端

AMS端 attachApplication

1
2
3
4
5
6
7
8
9
10
11
12
13
14
15
16
17
18
19
20
21
22
23
24
25
26
27
28
29
30
31
32
33
34
35
36
37
38
39
40
41
42
43
44
45
46
47
48
49
50
51
52
53
54
55
56
@Override
public final void attachApplication(IApplicationThread thread) {
synchronized (this) {
int callingPid = Binder.getCallingPid();
final long origId = Binder.clearCallingIdentity();
attachApplicationLocked(thread, callingPid);
Binder.restoreCallingIdentity(origId);
}
}


private final boolean attachApplicationLocked(IApplicationThread thread,
int pid) {

// Find the application record that is being attached... either via
// the pid if we are running in multiple processes, or just pull the
// next app record if we are emulating process with anonymous threads.
ProcessRecord app;
long startTime = SystemClock.uptimeMillis();
if (pid != MY_PID && pid >= 0) {
//在前面就已经以PID为关键字把目标进程的ProcessRecord保存起来了,这里通过pid把ProcessRecord取回来
synchronized (mPidsSelfLocked) {
app = mPidsSelfLocked.get(pid);
}
} else {
app = null;
}


//初始化APP
//app的成员变量thread应该设置为ApplicationThread代理对象
app.makeActive(thread, mProcessStats);
app.curAdj = app.setAdj = app.verifiedAdj = ProcessList.INVALID_ADJ;
app.curSchedGroup = app.setSchedGroup = ProcessList.SCHED_GROUP_DEFAULT;
app.forcingToImportant = null;
updateProcessForegroundLocked(app, false, false);
app.hasShownUi = false;
app.debugging = false;
app.cached = false;
app.killedByAm = false;
app.killed = false;

//删除PROC_START_TIMEOUT_MSG消息,因为应用程序已经启动起来了
mHandler.removeMessages(PROC_START_TIMEOUT_MSG, app);

// See if the top visible activity is waiting to run in this process...
if (normalMode) {
try {
if (mStackSupervisor.attachApplicationLocked(app)) {
didSomething = true;
}
} catch (Exception e) {
Slog.wtf(TAG, "Exception thrown launching activities in " + app, e);
badApp = true;
}
}

来到attachApplicationLocked,调用realStartActivityLocked启动要启动的顶端Activity组件

1
2
3
4
5
6
7
8
9
10
11
12
13
14
15
16
17
18
19
20
21
22
23
24
25
26
27
28
29
30
31
boolean attachApplicationLocked(ProcessRecord app) throws RemoteException {
final String processName = app.processName;
boolean didSomething = false;
for (int displayNdx = mActivityDisplays.size() - 1; displayNdx >= 0; --displayNdx) {
ArrayList<ActivityStack> stacks = mActivityDisplays.valueAt(displayNdx).mStacks;
for (int stackNdx = stacks.size() - 1; stackNdx >= 0; --stackNdx) {
final ActivityStack stack = stacks.get(stackNdx);
if (!isFocusedStack(stack)) {
continue;
}
stack.getAllRunningVisibleActivitiesLocked(mTmpActivityList);
final ActivityRecord top = stack.topRunningActivityLocked();
final int size = mTmpActivityList.size();
for (int i = 0; i < size; i++) {
final ActivityRecord activity = mTmpActivityList.get(i);
if (activity.app == null && app.uid == activity.info.applicationInfo.uid
&& processName.equals(activity.processName)) {
try {
//得到栈顶端的ActivityRecord,对应的就是MainActvity组件
if (realStartActivityLocked(activity, app,
top == activity /* andResume */, true /* checkConfig */)) {
didSomething = true;
}
} catch (RemoteException e) {
Slog.w(TAG, "Exception in new application when starting activity "
+ top.intent.getComponent().flattenToShortString(), e);
throw e;
}
}
}
}

realStartActivityLocked

1
2
3
4
5
6
7
8
9
10
11
12
final boolean realStartActivityLocked(ActivityRecord r, ProcessRecord app,
boolean andResume, boolean checkConfig) throws RemoteException {
//Binder通信,调用Activity所在的目标进程的scheduleLaunchActivity
app.thread.scheduleLaunchActivity(new Intent(r.intent), r.appToken,
System.identityHashCode(r), r.info,
// TODO: Have this take the merged configuration instead of separate global
// and override configs.
mergedConfiguration.getGlobalConfiguration(),
mergedConfiguration.getOverrideConfiguration(), r.compat,
r.launchedFromPackage, task.voiceInteractor, app.repProcState, r.icicle,
r.persistentState, results, newIntents, !andResume,
mService.isNextTransitionForward(), profilerInfo);

这样流程又回到ApplicationThread

ApplicationThread端scheduleActivity

1
2
3
4
5
6
7
8
9
10
11
12
13
14
15
16
17
18
19
20
21
22
23
24
25
26
27
28
29
30
31
32
33
34
35
36
37
// we use token to identify this activity without having to send the
// activity itself back to the activity manager. (matters more with ipc)
@Override
public final void scheduleLaunchActivity(Intent intent, IBinder token, int ident,
ActivityInfo info, Configuration curConfig, Configuration overrideConfig,
CompatibilityInfo compatInfo, String referrer, IVoiceInteractor voiceInteractor,
int procState, Bundle state, PersistableBundle persistentState,
List<ResultInfo> pendingResults, List<ReferrerIntent> pendingNewIntents,
boolean notResumed, boolean isForward, ProfilerInfo profilerInfo) {

updateProcessState(procState, false);

ActivityClientRecord r = new ActivityClientRecord();

r.token = token;
r.ident = ident;
r.intent = intent;
r.referrer = referrer;
r.voiceInteractor = voiceInteractor;
r.activityInfo = info;
r.compatInfo = compatInfo;
r.state = state;
r.persistentState = persistentState;

r.pendingResults = pendingResults;
r.pendingIntents = pendingNewIntents;

r.startsNotResumed = notResumed;
r.isForward = isForward;

r.profilerInfo = profilerInfo;

r.overrideConfig = overrideConfig;
updatePendingConfiguration(curConfig);
//向进程主线程的消息队列中发送一个LAUNCH_ACTIVITY消息
sendMessage(H.LAUNCH_ACTIVITY, r);
}

这个函数就是封装了一个ActivityClientRecord,然后发送一个LAUNCHER_ACTIITY的消息

处理逻辑在这里,每个App都是打包在一个apk文件里的,里面有Android的所有资源,ActivityThread里面用一个LoadedApk对象来描述已经加载的Apk文件

1
2
3
4
5
6
7
8
9
10
11
public void handleMessage(Message msg) {
if (DEBUG_MESSAGES) Slog.v(TAG, ">>> handling: " + codeToString(msg.what));
switch (msg.what) {
case LAUNCH_ACTIVITY: {
Trace.traceBegin(Trace.TRACE_TAG_ACTIVITY_MANAGER, "activityStart");
final ActivityClientRecord r = (ActivityClientRecord) msg.obj;

r.packageInfo = getPackageInfoNoCheck(
r.activityInfo.applicationInfo, r.compatInfo);
handleLaunchActivity(r, null, "LAUNCH_ACTIVITY");
Trace.traceEnd(Trace.TRACE_TAG_ACTIVITY_MANAGER);

image-20221009192036839

1
2
3
4
5
6
7
8
9
10
11
private void handleLaunchActivity(ActivityClientRecord r, Intent customIntent, String reason) {


//将Activity组件启动起来
Activity a = performLaunchActivity(r, customIntent);


//把Activity组件的状态设置成Resumed
handleResumeActivity(r.token, false, r.isForward,
!r.activity.mFinished && !r.startsNotResumed, r.lastProcessedSeq, reason);

仅需跟进performLaunchActivity,这个就是最核心的启动Activity的地方了,这里加载的Activity类,并完成了相应的初始化

1
2
3
4
5
6
7
8
9
10
11
12
13
14
15
16
17
18
19
20
21
22
23
24
25
26
27
28
29
30
31
32
33
34
35
36
37
38
39
40
41
42
43
44
45
46
47
48
49
50
51
52
53
54
55
56
57
58
59
60
61
62
63
64
65
66
  private Activity performLaunchActivity(ActivityClientRecord r, Intent customIntent) {
// System.out.println("##### [" + System.currentTimeMillis() + "] ActivityThread.performLaunchActivity(" + r + ")");
//获得ActivityInfo
ActivityInfo aInfo = r.activityInfo;
if (r.packageInfo == null) {
r.packageInfo = getPackageInfo(aInfo.applicationInfo, r.compatInfo,
Context.CONTEXT_INCLUDE_CODE);
}
//先获取要启动的Activity组件的包名和类名,他们用一个ComPonentName对象来描述
ComponentName component = r.intent.getComponent();


//为activity创建COntextImpl上下文,通过它可以访问特定的应用程序资源和启动其他应用程序组件
ContextImpl appContext = createBaseContextForActivity(r);
Activity activity = null;


try {
//加载Activity的类代码
java.lang.ClassLoader cl = appContext.getClassLoader();
activity = mInstrumentation.newActivity(
cl, component.getClassName(), r.intent);
StrictMode.incrementExpectedActivityCount(activity.getClass());
r.intent.setExtrasClassLoader(cl);
r.intent.prepareToEnterProcess();
if (r.state != null) {
r.state.setClassLoader(cl);
}
} catch (Exception e) {
if (!mInstrumentation.onException(activity, e)) {
throw new RuntimeException(
"Unable to instantiate activity " + component
+ ": " + e.toString(), e);
}
}

//创建Application对象
Application app = r.packageInfo.makeApplication(false, mInstrumentation);

//设置appContext
appContext.setOuterContext(activity);
//用appContext和ActivityClientRecord初始化activity
activity.attach(appContext, this, getInstrumentation(), r.token,
r.ident, app, r.intent, r.activityInfo, title, r.parent,
r.embeddedID, r.lastNonConfigurationInstances, config,
r.referrer, r.voiceInteractor, window, r.configCallback);


//初始化完毕后启动acitivty,此时activity的OnCreate函数会被调用
if (r.isPersistable()) {
mInstrumentation.callActivityOnCreate(activity, r.state, r.persistentState);
} else {
mInstrumentation.callActivityOnCreate(activity, r.state);
}

r.activity = activity;
r.stopped = true;
//执行onStart
if (!r.activity.mFinished) {
activity.performStart();
r.stopped = false;
}

r.paused = true;
//吧这个Activity加入到activities里面
mActivities.put(r.token, r);

到此根Activity就启动完毕了,可以看出其是连带着应用程序的启动的

进程内子Activity的启动

在Manifest中可以给Activity指定android:process属性,如果子Activity的process指定的和MainActivity一样,启动子Activity时,就会发现应用程序已经启动了,因此直接启动子Activity即可

启动子Activity的过程

  • MainActivity向AMS发送启动子Activity的请求
  • AMS保存子Activity信息,向MainActivity发送终止请求
  • MainActivity进入中止状态后,再向AMS发送请求完成,AMS继续启动子Activity
  • AMS发现子Activity的进程已经存在,就把要启动的子Activity信息直接发送给应用程序进程,让其启动子Activity

这其中大部分步骤都一样。

新进程中子Activity的启动

总结

进程实际是Linux底层的概念,其在Android Framwork层中的作用就是支撑实现,以及实现权限的划分,

Activity等组件才是Framwork层的基本组成部分,这就是常见的计算机中的分层的概念,而Task是一个更高级和抽象的概念,每一个Activity都是运行在一个Task中的,Task里整合了一系列相关的Activity组件,目的是共同完成一个业务功能。

在开发应用程序时,如果一个Activity—SomeActvity需要一个E-mail发送功能,就可以将Email中的EmailSender组件启动起来,运行在同一个任务中,等到Emai发送完毕后,再返回SomeActivity中,整个过程中用户根本不会看到SomeActivity和EmailSender是运行在两个不同的应用程序进程的。